
Introduction
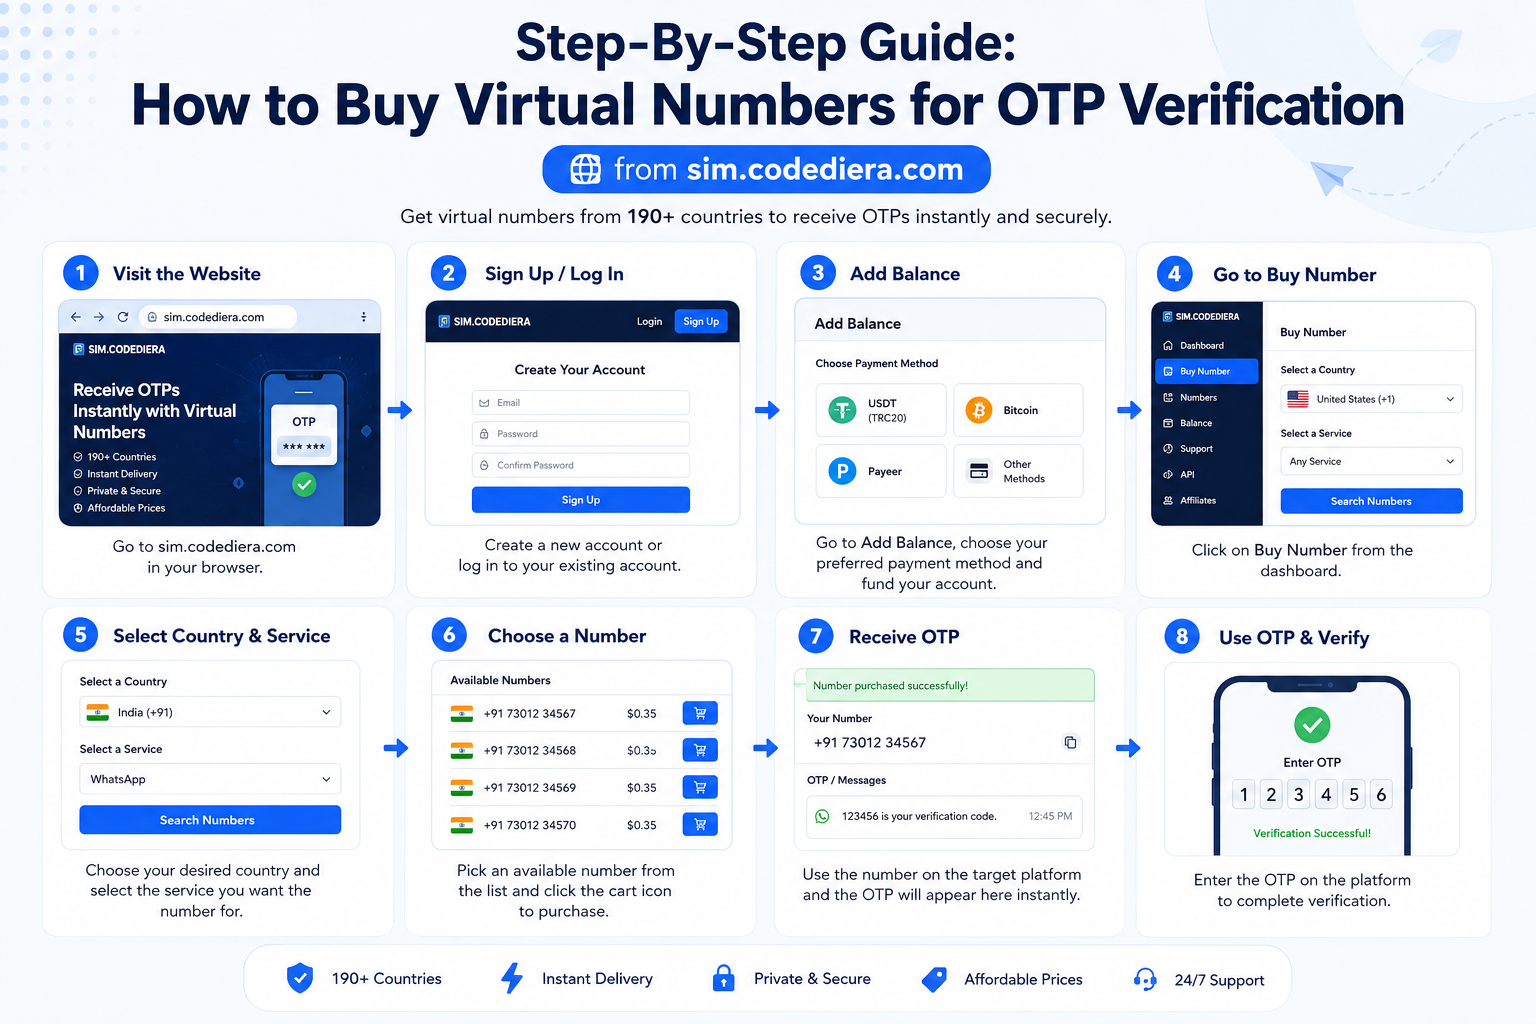
Virtual numbers have become a staple for users who need a reliable way to receive One‑Time Passwords (OTPs) without exposing their personal phone. Whether you’re signing up for a new app, verifying a payment method, or protecting your identity, a virtual number can simplify the process. In this guide, we walk you through every step—from choosing the right plan on the services page to funding your account via the wallet and finally confirming your purchase with a smooth login flow.
Why Use a Virtual Number for OTP?
There are several compelling reasons to use a virtual number instead of a personal line:
- Privacy: Keep your personal number out of the public eye.
- Security: Reduce the risk of SIM‑swap attacks.
- Convenience: Use a single number across multiple services.
- Cost‑Effective: Pay only for the minutes you need.
Step 1: Sign In to Your CodeSim Account
Before you can purchase a virtual number, you must log in. Visit the login page and enter your credentials. If you’re a new user, click the sign‑up link and create an account. Once logged in, you’ll have access to the dashboard where you can manage your numbers and wallet.
Step 2: Browse the Virtual Number Catalog
Navigate to the services page. Here you’ll find a categorized list of virtual number options—by country, carrier, and plan type. Pay close attention to the following details:
- Country: Choose a region that matches your target audience or compliance requirements.
- Number Format: Verify that the format (e.g., +1‑555‑123‑4567) is supported by the service you plan to use.
- Pricing: Each listing displays the cost per minute and a monthly subscription fee if available.
- Validity: Some numbers are short‑term (e.g., 30‑day rental) while others are long‑term (e.g., 12‑month lease).
Once you’ve identified a suitable number, click the “Add to Cart” button.
Step 5: Confirm and Activate Your Virtual Number
Return to the cart and review your order. When you’re ready, click “Proceed to Checkout.” The system will calculate the final price, including any boost fees, and present a summary. Confirm the details, then click “Place Order.” You’ll receive a confirmation email and a dashboard entry for the new virtual number.
Receiving OTPs
Once the number is active, you can use it in any service that requires phone verification. The OTPs will arrive directly to the virtual line, and you can read them through the CodeSim dashboard or via SMS forwarding, depending on your preference.
Managing Your Virtual Numbers
From your dashboard, you can:
- View Call Logs: See all incoming and outgoing calls.
- Check Balance: Monitor remaining minutes and usage.
- Renew or Cancel: Extend the lease or terminate the number.
- Transfer: Move the number to another account if needed.
FAQ
Can I use a virtual number for two‑factor authentication?
Yes, virtual numbers are fully compatible with most 2FA services. Just enter the number during the setup process.
What happens if the number is no longer available?
If a number becomes inactive due to non‑payment or expiration, you’ll receive a notification. You can then renew or choose a new number from the catalog.
Is there a limit to how many virtual numbers I can own?
Standard accounts allow up to 10 active numbers. Boosting your account can temporarily increase this limit.
Can I receive international calls on a local virtual number?
Some plans support international call forwarding. Check the services page for specific details.
Conclusion
Purchasing a virtual number for OTP verification is a straightforward process when you follow the steps outlined above. From logging in to boosting your account, topping up your wallet, and finally activating the number, CodeSim provides a seamless experience that keeps your privacy intact and your verification process hassle‑free.
Ready to Get Started?
Head over to the wallet page, add the funds you need, and then purchase your first virtual number from the services catalog. Your OTP‑ready virtual line is just a few clicks away!